Showing posts with label Equipment Review. Show all posts

Thursday, May 29, 2014

Equipment Review - Corcoran Combat Boots


I have a confession.  I wear combat boots.  Not fashion boots, or pretty boots or feminine boots - but combat boots.  Nearly every morning I slide my feet into my boots, give the speed laces a pull and I'm instantly ready to meet the day.  My boots carry me through my morning hikes, daily wood cutting excursions and gardening tasks.  They accessorize my skirts, enhance my wardrobe and just plain fit my feet.  I wouldn't leave home without them.

How did I come to wear such eccentric footwear?  Actually, it was nothing more than a happy accident.  I started hiking a few years ago and quickly walked through too many pair of boots to count.  I would spend a few weeks breaking in new boots (blisters and all), walk about 300 miles, throw the boots in the garbage and start all over again.  Finally, I bought a pair of Corcoran combat boots.  I slid my feet into the boots and knew I had found my new best friends.  They were actually made to fit my feet - I didn't have to force my feet to fit the boots or have my toes squeezed unbearably!  The toe bed was wide and the arch support excellent, a perfect fit. 


I did have to break the boots in (I doctored blisters for about a week) but have worn them happily every day since (about a year and a half).  I have come to truly appreciate their ruggedness and fit and have even come to appreciate their handsome good looks!  I love them so much that I have added another pair to my collection.  Now, I have not only a stylish OD pair, but also black with leather toe caps.

As far as I'm concerned combat boots are a preparedness essential.  Comfortable, durable, well-fitting boots are a requirement if you are on the move or on the homestead.  Sir Knight swears by Danner boots and Master Hand Grenade loves his RAT boots, but me - I think I'll stick with my Corcoran's!

Until next time....

Enola


Thursday, January 31, 2013

Equipment Review - Bogs Boots


Boots are a necessity of country life.  Work boots, mud boots and snow boots line closets and stand at attention behind doors.  During the winter months, our shouse is awash in boots.  Because our winters are a mixture of freezing temperatures and mini "thaws", our snow boots are nothing if not constantly wet.  On top of that, we have active children, so we always make sure to have at least two pair of snow boots and one pair of mud boots apiece.  That way, while one pair dries behind the cookstove, the other can be in use.  The problem with this system is the shear multitude of boots.  Just think, 3 pair boots each times 5 children - that is 15 pair of boots - not even counting Sir Knight and I!

One year we tried to make do with one pair of snow boots and one pair of mud boots.  We thought that would keep feet dry when it was wet outside and warm when it was cold.  It worked, mostly - but it was still challenging trying to keep up with so many boots and the children inevitably slipped on their mud boots when it was wet (and cold - think slush) and their feet would freeze, no matter how many pair of socks they wore.  Or, they would pull on their snow boots and end up with wet (and cold - think slush) and freezing feet (again!).

This year, I decided to go out on a limb and try something new.  Bogs.  The theory was that we would have one pair of boots for the winter, rather than three.  Bogs are waterproof (unless the water or snow goes over the top!) and good to -40°.  Mud boots and snow boots, all in one convenient package!

First, I bought Bogs for the little children.  I thought if they could make it through 5 and 7 year old, rough and tumble country kids, they could make it through anything.  Master Calvin, Princess Dragon Snack and I sat at the computer and went shopping.  Calvin chose a pair of sensible black boots and Dragon Snack chose a flashy pair of purple boots with a riot of flowers emblazoned on them.

The boots arrived and were opened in a flurry of excitement (the children had never had brand new boots before!) and fit perfectly.  That was in September.  They haven't been off their feet since.  Well, maybe to sleep, but really, that's about it!  The kids LOVE them.  Never have they complained of their feet being cold - not even once.  The only time they have had wet feet has been when they tucked their snow pants into their boots and snow filled their boots.  Oh, and there was that one time Master Calvin waded in a mud puddle that was up to his waist - but that probably wasn't a problem with the boots.

After a successful trial run with the littles, Miss Serenity ordered a pair of Bogs.  She chose my favorite color, OD green!  Again, the Bogs passed the test.  Serenity is harder on boots than any of our children (she's all go - no quit) and her boots still look like new (except for the mud).  She did trip over some barbed wire that was hidden in the snow and ripped a small hole in the top of her boots, however they still seem to be waterproof.  We will take them to Les Schwab Tire the next time we are in town and have them repaired (they put on patches, like they would fix a tire).

Sir Knight is up for Bogs next.  We will continue to buy boots, one pair at a time, until the whole family has been shod.  I love the fact that we now only require one pair of boots rather than three (our shouse is only so big!) and the kids love the fact that they have warm, dry feet.

Good boots are non-negotiable.  Bogs have met and exceeded our expectations.  The only down side of Bogs are the price.  Generally, I buy snow boots at thrift stores, garages sales or through Ebay and I have to admit that it was somewhat difficult for me to sit down and order expensive boots online.  However, I am convinced that in the long run we will be saving money.  Not to mention, the Bogs seem to be constructed well enough that we will be passing boots from one child to another (well, maybe Master Calvin won't really want to wear Princess Dragon Snack's purple boots).  From what I have seen, Bogs will wear through many a fall/winter season.

If you live in the country (or in the city, for that matter) and need a good, solid pair of mud/snow boots, Bogs just might the the boot for you.  I know that I will be stocking up (as I am able) so that I can keep my family's feet warm, dry and well protected.

Thursday, December 20, 2012

What Every Girl Wants


Like most girls her age, Miss Serenity has a few things on her want list that are rather expensive.  In an effort to teach her that something worth having is worth working and waiting for, we encouraged Miss Serenity to work hard and save her money, until, at last,  she was able to afford her flight of fancy.  In an effort to acquire her needful thing, Miss Serenity bucked hay bales, took care of a neighbors ranch nearly every weekend of the summer, split and stacked firewood and did odd jobs whenever they were available.  After nearly 3 months of work, squirreling away every dime earned, Miss Serenity had saved $350.00 - just enough to purchase what every girl wants.

And just what does every 13 year old girl want?  A crossbow.  Yes, you read that right.  Miss Serenity scrimped and saved all summer to buy an olive drab, composite stocked, tactical crossbow.

After researching for hours (with a lot of input from Sir Knight), Miss Serenity settled on the "Horton Brotherhood".  After reading reviews on dozens of crossbows, the Horton Brotherhood stood out as a high-quality bow at a reasonable price, not to mention, Horton has a reputation for excellent customer service.  Miss Serenity was looking specifically for a crossbow that she could hunt with, meaning it had to have a bolt speed of over 300 feet per second and a draw weight of 150 pounds and takes 20 inch bolts.  The body of the Brotherhood is all polymer which renders it rugged with no possibility of rusting.  The limbs are compound configured with a 55% let off (after you pull the cams past the half-way point, the draw weight drops to 75 pounds but retains the 150 pound rating of the bow).  Miss Serenity can cock this bow without assistance, but it is difficult.  In an effort to reduce the strain of cocking the bow, Serenity bought a cocking string, a $15.00 expense that is more than worth its weight in gold.  It is a simple device that makes all the difference in the world.


Using the cocking string

Cocking is super easy!
One bit of research that Sir Knight felt was essential before making a purchase was getting hands-on experience with a crossbow.  In that vein, Miss Serenity and Sir Knight made an afternoon trek to the nearest Cabella's and spent an hour test firing various crossbows in their indoor firing range.  One thing they noted was that crossbows have an entirely different feel than rifles of similar weight.  The weight of a rifle is centered in the middle whereas the crossbow is very front heavy.

Although Cabella's carries the crossbow (online) Serenity was planning on purchasing, she chose to buy it through another online shop on Ebay because the price savings was significant.  We noticed that the Horton Brotherhood sold for anywhere from $299 (what Miss Serenity paid for it) to $500!  As usual, a little research goes a long way.

Having used her crossbow for a month now, and putting it through its paces, Miss Serenity highly recommends the Horton Brotherhood.  Sir Knight classifies it as a high quality beginners hunting crossbow at a good price.  Some things he notes:


  • The Brotherhood crossbow packages are all the same with the exception of the fact that one is green and one is "real tree" (we, of course, chose olive drab!).
  • The covers on the provided scope are cheesy and must be replaced with Butler Creek popup scope covers.
  • Horton really screwed up by not putting a decent quantity of rail lube and totally forgot to put any string wax in this kit.  This is essential and should be included in the kit.
  • The instructions don't mention it but Sir Knight recommend assembling it with blue "loc tight".
  • The instructions are really vague on the installation of a cable guide that comes with the kit.  It is a plastic piece that prevents the cables from rubbing on the bow and fraying.  The instructions claim that this cable guide is only used with crossbows that have aluminum barrels (The Bone Collector), but the cable started to fray almost immediately and the Brotherhood actually has a slot in the cable guide for this cable protector.  Sir Knight installed it and it worked flawlessly, despite the instructions.
  • The special Horton Rail Lube is nothing more than odorless silicone grease (for lubricating o rings).  We bought it real cheap at a local hardware store.  
  • The Horton string wax can be replaced by a brick of beeswax (carried in your pocket or in your gear).  
  • String wax and rail lube must be used regularly to prevent wear on the string and cables.  This is essential.
  • Lubricants, such as Tri-flow or graphite are necessary to keep the compound wheels quiet, but will not need to be used as much as the rail lube and string wax.
Watch out - this girl is a dead-on shot!
Just so you know, this is no toy.  It is powerful and deadly.  Always keep your bow pointed in a safe direction and never knock a bolt until you are prepared to shoot at a target.

And now you know what every girl wants - a crossbow!

Tuesday, December 4, 2012

Equipment Review - The Wyoming Saw


Master Hand Grenade did it.  On the very last day, in the very last hour of hunting season 2012, he bagged his deer!  Saturday, Sir Knight and Master Hand Grenade set out one final time to test their hunting skills.  As the afternoon drew to a close and twilight threatened, a doe came into view, turned broadside, and became sustenance for our family.

Sir Knight and Master Hand Grenade gutted the doe in the field (the coyotes have to eat too, ya know) and brought her home to hang and skin her.   Over the years, we have found that a few good tools go a long way when processing game.  First, of course, is a sighted-in rifle (that goes without saying), a handgun (just in case you have to finish the job), a sharp knife and the ever handy Wyoming saw.

"Fresh" from quartering Master Hand Grenade's deer
Thin but sturdy stainless steel spine

The bone blade
The little Wyoming saw has been one handy tool.  It is very well designed.  The construction is aluminum (the handle) and stainless steel (the spine of the saw) and carbon steel (the blades) - very high quality.  This particular little saw can be used for quartering game, making forts in the back yard, cutting down Christmas trees or any other project you find it suitable for.  It comes with two blades - one for wood and one for meat and bone.  It is very easy to disassemble and clean and stores in one handy little pouch, making it perfect for your pack or bug-out-bag.  The spine of the saw is thin so that it can follow the blade through the cut you are making, enabling you to even quarter an animal as large as an elk without the use of a large meat saw.  We have found absolutely nothing that this saw will not handle in the field.

Disassembled and ready to clean
Clean and ready to store in case
All buttoned up
Wyoming now makes a larger saw - The Wyoming Saw II, but I have found no need for a larger saw as the original has worked flawlessly for us.  If you are in the market for a versatile, compact saw, take a look at the Wyoming.  You can't go wrong.


Tuesday, November 27, 2012

Product Review - Zebra Light


Our family has a thing for flashlights.  We have lived for over 12 years in a shop that was never intended to be a house and consequently is very poorly lit.  In addition to our poor lighting situation, we have after-thought, off-grid power, which makes finding a light switch in the middle of the night a challenging proposition.  Due to these little quirks, along with the fact that we have no outside lights and frequently have to start the generator in the dead of night, we have a constant need for quality flashlights.

Over the years we have tried them all.  Mag Lights, Surefire's and Streamlight's have all graced our home.  We have used rechargeable flashlights, LED flashlights and wind-up flashlights.  And one by one, they have all died - some by trauma and others by attrition, but none have withstood the rigors of off-grid, everyday extreme use.

Not too long ago, our friend, Joe Nobody, sent a product review for us to post on our blog.  He had field tested (for many years) the Streamlight Sidewinder and had nothing but good things to say about it.  Sir Knight ordered one (and is the process of field testing it - under extreme duty, of course) and he couldn't be happier, however, he was still in the market for a top notch headlamp.

Although flashlights are handy, more often than not we need the ability to be "hands free" while completing our tasks.  Having looked high and low for a rugged, high quality, durable headlamp that took AA batteries (our group standard) we had concluded that such a thing didn't exist and we would have to lower our expectations.  But then, we found the Zebra Light.

After digging through pages of internet nonsense, Sir Knight came across the Zebra Light (Model H51 Headlamp) and thought it looked promising.  He read every review he could find and came to the conclusion that the Zebra Light met or exceeded all of our requirement with the exception of two....1st - it is made in China - this is very distressing, and 2nd - it is cost prohibitive.

Realizing that we did indeed NEED a headlamp (it is nothing less than a tool for our family), Sir Knight decided to blow the big bucks and make an investment in the Zebra Light.  Wow!  To say that it met all of our expectations would be an understatement.  Not only did the Zebra light meet our expectations - it exceeded them!
Side-by-side comparison with Surefire 6v LED flashlight (both with fresh batteries)
The Surefire is on the left with the Zebra Light on the right

Compact size and sturdy construction
The Zebra Light uses cutting edge LED technology (I don't know how this is different from "regular" LED's, but I can tell you that it is REALLY bright!) and runs on....WAIT FOR IT....1 AA battery!  It has 3 settings - low, medium and high, and those setting are adjustable (with two settings each).  When running on the low setting, it will run for 16 DAYS (on 1 AA battery!) and on high it runs for .9 hours.  The body is made out of anodized aluminum and the cap has an o-ring seal (making it water resistant) and the fit and finish is perfect.  In reality, this headlamp is really just a flashlight that has a headband attachment, making it incredibly versatile.  The Zebra Light System comes with the light, spare o-rings (for the cap), the headband and two rubber holders to attach the light to the headband - one black and one glow-in-the-dark (Sir Knight thinks that the glow-in-the-dark attachment (worn directly in the middle of your forehead) may be a tactically bad idea).  There is a removable clip (that is attached to the light) that can be woven into any knit stocking cap, through a button hole, through two slits cut into a ball cap or clipped onto your molle gear making it highly practical in any situation.  It is important to note that if you back the tail-cap off 1/4 of a turn, it will not accidentally turn on in your pack or your pocket, forestalling an unpleasant surprise when illumination is required.

The offending glow-in-the-dark option
Pertinent Zebra Light Information:


  • Light Output
    • High:         H1 200 Lm (0.9 hrs)   or    H2  100 Lm (2.4 hrs) / 140 Lm (1.7 hrs) / 4Hz Strobe

    • Medium:    M1  30 Lm (8 hrs)    or    M2      Lm (26 hrs)

    • Low:         L1   2.Lm (3 days)   or    L2   0.2 Lm (16 days)

    • Light output are out the front (OTF) values. Run time tests are done using Sanyo 2000mAh Eneloop AA batteries.


Other than the price we LOVE this light.  It has proven to be rugged, useful and highly reliable.  If you NEED an extreme use flashlight, the Zebra Light is the one for you!


Saturday, July 21, 2012

Cast Iron Waffles


O.K., so the waffles themselves are not cast iron, but the waffle iron is!  Here is the deal - I have a love/hate relationship with waffle irons.  For years I used an ancient waffle iron that we had picked up somewhere or other.  It was rectangular and the waffle section was reversible - one side was for waffles and the other was a simple griddle.  I never used the griddle side but I made waffles all the time (they happen to be a family favorite).  When I got our waffle iron, it was ancient and over time the cord became dodgy and then dangerous.  Sir Knight (being the electrical genius that he is) rewired it and we got another 10 years out of it.  Finally, after too many waffle to count, our old waffle iron gave up the ghost.

Being preppers, we decided to step up to the plate and buy a non-electric waffle iron. Browsing through the Lehman's we found the perfect solution, or so we thought - a Teflon coated aluminum Belgian waffle iron!  Excitedly, we waited for our new waffle iron to arrive in the mail.  When it finally arrived, we decided to have a non-electric evening (this was long before we went off-grid).  Off went the lights and out came the kerosene lamps as the wood cookstove bubbled along in the living room.   Putting my cast iron griddle on low on the cookstove, I started cooking bacon.  As the bacon was cooking, I mixed up a waffle batter, set up a little cooking station next to the stove and brought out my nice, shiny waffle iron.  With great expectations, I poured the batter on the waffle iron, slid the iron over a medium fire and waited for waffle magic.  As the waffle started to smell, I turned the waffle iron over, continue to cook it and finally, having determined that the waffle was done, opened the iron, anticipating a perfectly golden, deliciously crunchy Belgian waffle.  The waffle iron wouldn't budge!  The waffle had cooked up and now held the waffle iron hostage.  No matter how I tried to cajole that waffle out of the iron, it was not to be.  In desperation, I pulled the waffle iron open and split the waffle right down the middle.  I had to scrape and scrub and scrape some more before I finally cleaned all the remnants of waffle out of my new waffle iron.  Greasing the waffle iron again (making sure to get every crack and crevice) I gave the waffle iron another try.  Nope.  Not this time either.  The waffle just seemed to bake into the waffle iron and become an impenetrable mass of baked batter.  Apparently, Teflon isn't always "no-stick"!

After attempting our fancy non-electric waffle iron innumerable times, we finally admitted defeat.  This time, we bought a shiny, beautiful new waffle iron with temperature adjustments and a whistle that sounded when the waffle was done to perfection.  Truthfully, this waffle iron was wonderful right out of the box.  It never stuck and always produced golden waffle perfection.  Until it died, that is.  One evening I planned waffles and bacon for dinner.  It was hot outside and I didn't want to heat the house up by starting the propane stove.  I started bacon, plugged in the waffle iron and proceeded to mix up the batter.  The bacon was done, the batter was ready and I opened the waffle iron.  Nothing.  It wasn't even a little bit warm.  I fussed with the temperature dial, unplugged it and plugged it back in, tried a different outlet.  Nothing!  I asked for a second opinion and Sir Knight rendered the verdict - DOA.  We had to make do with waffle pancakes (you know, pancakes made out of waffle batter) while pretending we were eating crispy, sweet waffles.

I didn't really want to buy another electric waffle iron, but the non-electric version was out of the question.  And then the solution presented itself.  The kids and I were wandering through an antique/junk store and there it was - a cast iron waffle maker!  I had seen these little beauties before but never really given them much thought until now.  Looking it over, I knew we must give it a try.

Oh, wow!  This little waffle iron is worth its weight in iron.  It did take a little experimentation and a bit of getting used to, but when you get it right, it produces the most wonderfully golden, crunchy waffles ever.  Because of the design, it can be used on a wood stove, a gas range or even over an electric burner.  Talk about versatile!

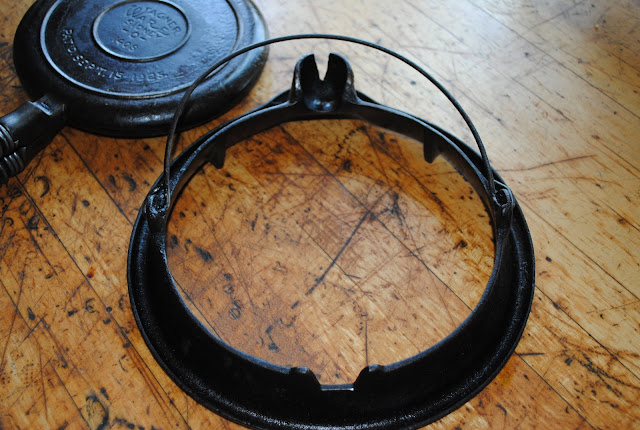
Ring base (with socket)
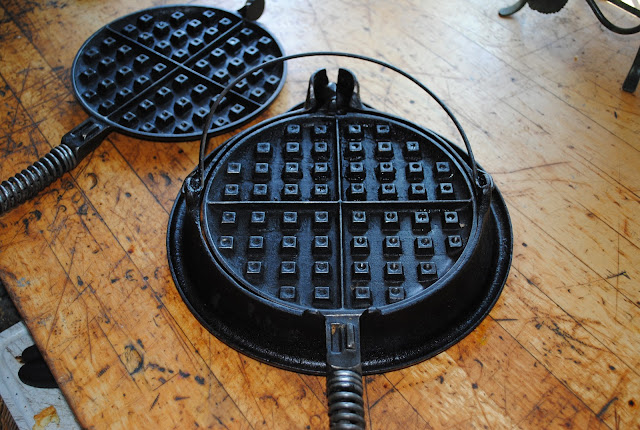
Half of the waffle iron
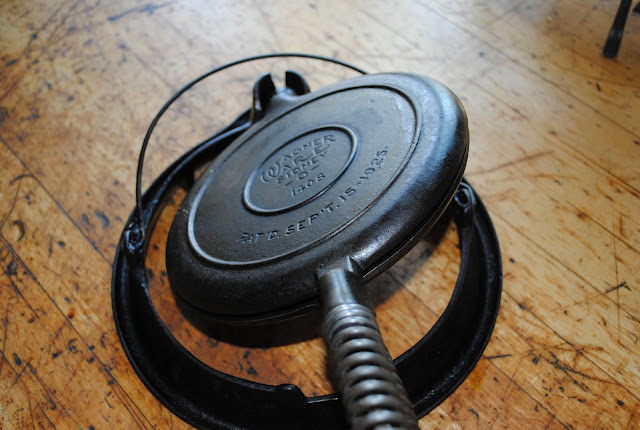
Lifted slightly and turning in the socket
The waffle iron is a three part system.  It has a ring with a socket and two waffle irons that form a ball (that fits nicely into the socket on the ring).  You place your waffle iron over your heat source, generously grease the inside of the iron, pour in batter and close the iron.  Halfway through cooking, you lift the iron slightly, (holding both handles) turn in the socket and cook the other side of the waffle.  Ingenious!  The first couple of waffles stuck on the "top" side of the waffle iron.  This was the side that I had closed down over the waffle.  The "bottom" didn't stick at all.  What I determined was that the top needed to be as hot as the bottom.  I would grease the bottom of the iron then lift and turn and grease the "top", pour in the batter and cook - that way, both the top and bottom of the iron are hot when the batter goes in.  When I employed this method, there was little, if any sticking!  The waffles just popped right out.

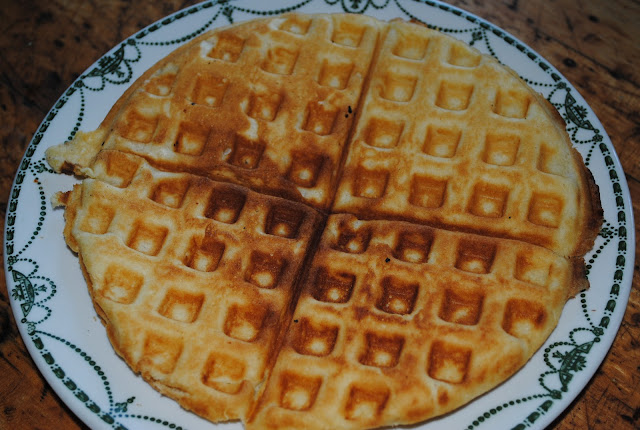
Just out of the iron
We are officially hooked!  I will be keeping my eye out for another cast iron waffle iron so that we can move through our breakfast a little quicker (there are 7 of us!), but I am thrilled with our newest non-electric gadget.

Being a prepper is a way of life.  Finding tools that will serve your purposes now and will also be useful if the grid goes down is like having your cake and eating it too!

Cream Waffles
2 C. flour (either white or wheat)
4 tsp. baking powder
1/2 tsp. salt
2 tsp. sugar
1 3/4 C milk
2 eggs, separated and beaten
1/2 C butter, melted

Mix dry ingredients together; add milk and egg yolks.  Blend in melted butter; gently fold in stiffly beaten egg whites.  Lightly grease a heated waffle iron; add batter and heat according to waffle iron's instructions.  Makes 4 to 5 servings.  (We always double this recipe).


Breakfast is served!

Wednesday, May 23, 2012

Equipment Review - Surefire Helmet Light


This equipment review promises to provide more information than any other helmet light review on the web.  Really.  When reviewing flashlights, most product testers don't bother to deal with the basics, such as proper flashlight cleaning.  Even if they touch on the subject, they say something ignorant like "wipe with a soft, clean rag".  The Paratus Familia product test team went one step further.  We put the flashlight through its paces and tossed it in the washing machine - with a load of laundry.

Knowing that people would be using their Surefire Helmet light in all types of inclement weather, we allowed the flashlight to remain submerged in the washing machine all the way through the 45 minute heavy duty cycle.  When the spin cycle was completed we retrieved the light, dried it off with a bath towel and flipped the switch.  Eureka!  The light worked.  We were truly impressed!

O.K., so we didn't really mean to toss the flashlight in the washing machine - but sometimes these things just happen.  We truly were impressed that, being submerged for the better part of an hour, the light worked flawlessly.  That makes the Surefire a light worth owning!

The Surefire Helmet Light is just what it's name suggests.  It comes with a bracket that easily attaches to either a PASGT Helmet or a MICH Helmet.  It has 3 regular LED's and 2 blue LED's (specifically for use with Night Vision - the blue light won't disrupt your optically assisted night vision) and also has an infrared pulsing function that can only be seen when using night vision (which helps eliminate "friendly fire").  The Surefire helmet light uses one CR123 battery and has a long run time.

Light attached to the helmet
Light bracket
The light
The switches and battery compartment
Three white LED's
Blue LED's
Infrared
Once the bracket has been attached to your helmet, the light is easily removed for use independent of the helmet.  Master Hand Grenade regularly grabs his light, stuffs it in his pocket and heads out to start the generator in the dark.  However, when it is attached to the helmet, it provides great hands-free illumination.

Surefire helmet lights are rather expensive.  If you are looking for an inexpensive, every day light, this Surefire is not for you.  If, however, you are looking for a light to use when you are in full tactical gear, the Surefire helmet light just may be your answer.

Saturday, April 7, 2012

Equipment Review Retraction - Gerber Omnivore


Flashlight Shootout!

A while back we reviewed the Gerber Omnivore flashlight.  (The review can be found here).  We had used it for a couple of months and where more than satisfied.  Long term use (if you can call 12 months long term), however, proved the Omnivore to be less than satisfactory.  In this vein, we decided to provide you with a "Flashlight Shootout".

Contender #1 - Gerber Omnivore

  • Price:  $27.00
  • Construction:  Machined aircraft grade aluminum, waterproof - sealed with O rings
  • Batteries:  Capable of using AAA, AA and CR123 batteries (a huge selling point)
  • Specifications:  Ultra-bright LED lamp


Contender #2 - Thrift Store child's flashlight
  • Price:  $.25 (Yes, that is 25 cents!)
  • Construction:  Plastic (glows in the dark if you hold it up to the light!)
  • Batteries:  3 AAA battery pack (can use rechargeable)
  • Specifications:  Old-school multiple LED technology


How we conducted the test:

The Gerber Omnivore was used for multiple mundane lighting tasks.  It lived indoors, on a hutch with our radio gear and our rechargeable battery equipment.  It was used only by adults (with the occasional teenager using it to light the way to the generator) and never was exposed to moisture.  

The thrift store child's light was owned by a three year old.  It spent most of its life living under piles of toys, under beds and sitting in spilled hot cocoa.  It also survived several trips down the stair case, landing on the concrete floor.  It disappeared for approximately three months and was discovered hibernating in a snow bank.  It was used as a gun, a club and occasionally a flying projectile.

Flash Light Comparison:

How did our contenders fair?  The Gerber Omnivore's off/on switch failed completely, rendering the flashlight little more than a very expensive piece of aluminum.  We have been completely unable to contact Gerber (their website won't load using Safari) and have been unable to resolve the Omnivore's issues.  Even after disassembling the switch, Sir Knight was unable to resolve the problem.  It appears to be in a section of the switch that is sealed.  

The $.25 thrift store flashlight is still working well.  No matter how many times it bounces down the stairs, off siblings heads and off rocks in the front yard, it still performs flawlessly.  The on/off switch always works and the glow-in-the-dark feature is a popular feature with 3 and 4 year old flashlight owners.  The fact that Dad regularly asks to use his flashlight is also rather exciting.

The good, the bad and the ugly?  The expensive flashlight left much to be desired, namely, illumination.  Ultimately, if a flashlight no longer lights up it has become worthless.  We really wanted to love the Omnivore.  The fact that it could accept multiple batteries only added to its usefulness, however, it is only useful as long as it works.  We would rather purchase tons of cheap flashlights than spend a lot of money on one or two expensive ones that don't hold up.  It appears that the adage "you get what you pay for" is not true in this instance.  The thrift store flashlight was by far a better deal than the Gerber.


Once again, I would encourage everyone to use what they have.  If you don't use it now, you won't know what to expect when you really need it.  

We will continue our search for a worthwhile emergency flashlight, meanwhile, we hope that you "use it, use it, use it"!

Wednesday, June 22, 2011

Equipment Review - Skydex Helmet Pads


**** *
Over the years, we have accumulated a number of helmets to round out our gear.  We were able to acquire several PAGST helmets, which are Kevlar, and rated with a protection level of threat IIIA.  With new helmets being issued to troops, these older helmets are available relatively inexpensively.  We paid $50.00, used (each), for two medium sized helmets.  These older helmets come equipped with a nylon harness system with a leather sweat band and one strap that goes under the chin.  While these harness systems work, they are not particularly comfortable and they do not offer near the level of protection that the newer helmets provide.  Enter the Skydex conversion kit.

Original harness system
Skydex offers a conversion kit for the PAGST helmets that brings it in line with the level of protection offered in the newer issue helmets.  The kit is complete, including cushioned inserts and new harness system.  Velcro (to stick the pads to the inside of the helmet) and all of the hardware required to update the helmets come in the kit.

Complete Skydex kit

Skydex pads
Velcro and harness system
The first order of business when updating a helmet, it to completely remove the old harness system and wipe the interior of the helmet down with alcohol wipes (provided in the kit).  Once the helmet has been properly cleaned, the Velcro is applied to the helmet in accordance with the schematic provided in the kit.  The four-point harness system is installed next, along with a strap that goes around the inside of the helmet (this allows you to attach a camouflage cover to the helmet).  Finally, the pads are installed (as shown in the instructions) and configured to fit your head.  Simple.

Skydex four-point harness assembly
Unintended "pony tail port"
Updated harness
The Skydex conversion is far superior to the old harness in protection level and overall comfort.  While the newer MICH or ACH helmets provide slightly better ballistic protection from high speed fragments, is lighter and cut higher in the front to allow for the use of goggles, the Skydex conversion can be a cost effective way of adequately updating your older style helmet.

Inside of newer MICH helmet
Skydex kits can be purchased relatively inexpensively (about $25.00) from Uncle Sam's Retail Outlet (and other sources).  We give the Skydex kit a 4 star rating.  It is easily installed (takes about 20 minutes), is sturdy, comfortable and affordable.  If you have an older helmet, consider upgrading with a Skydex conversion.

Monday, June 20, 2011

Gerber Omnivore Review - Revisited

Examples of tactical flashlights
(the XD isn't a tactical light - it just looked good in the picture!)
More information was required to illuminate our flashlight review.  Sir Knight went through the comments and tried to answer them all, to the best of his ability.

This information is for the Gerber Omnivore Model #22-80147
1.  Output:  50 lumen's, 67 lumen's with the CR123 batteries.  For comparison, the mini-mag light puts out 12 lumen's (with a standard bulb).

2.  Tactical capability:  While this light could be used as a tactical light, the fact that it does not have a momentary off/on switch would preclude this light from being considered "tactical".

Use of tactical light
Another method

3.  Run time:  12 hours, with AA battery.  3.15 hours with the CR123.  There are no specs available for AAA run times.

4.  Can this be weapons mounted:  Yes.  This could very easily be mounted to a shotgun using the Elzetta Mount.  That particular mount will accept all flashlights with a diameter of .70" to 1.05".  The Omnivore Model 22-80147 measures 1.04", and will just fit in this mount.  Due to the LED construction of this lamp, it is quite suited for a weapon mounted light.  LED's are non as susceptible to damage from recoil as incandescent and xenon lamps.

Elzetta Mount

5.  Boat tape:  Most hardware stores sell self-adhesive, non-skid tape (like you would use in the bottom of your bathtub).  It is easily cut with scissors.

6.  Price for the Omnivore:  Anywhere from $25.00 to $35.00.

Sure Fire light with Butler Creek cap